sexta-feira, 5 de maio de 2017

Aperf. VIII - 50 Xmas


Plugins:
Filters Unlimited 2.0
Simple - Blintz 
VM Natural - Sparkle 
Mura's Meister - Pole Transform i
Mura's Meister - Copies 
Alien Skin Eye Candy 5 Impact - Glass
Plugins Simple t VM Natural podem ser importados e utilizados no Plugin Unlimited.


Coloque as seleções na pastinha de seleções.
Abra a mask e os tubes no PSP e minimize.


1. Abra uma imagem transparente de 650 x 500 pixels.

2. Coloque no Foreground a cor clara #f0decf,
e no Background a cor mais forte #8c1826.


3. Pinte a imagem com a cor do foreground.

4. Selections / Select all.

Abra o tube Min@.4146.Woman.07.16 - apague a marca dágua - Edit / Copy.
.
Edit / Paste into selection na imagem.

Selections none.

5. Effects / Image effects / Seamless Tiling / Defauld.

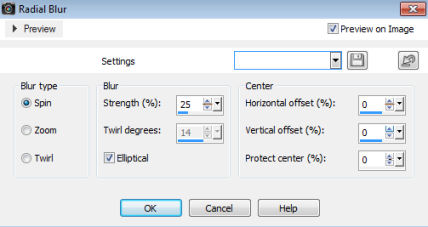
6. Adjust / Blur / Radial blur: Zoom marcado / 65 / 50 / 25 / 0 / Eliptical desmarcado.


7. Layers / Duplicate.
Image / Mirror.
Image / Flip.

8. Mude o Blend mode para Soft Light.

9. Layers / Merge Down.

10. Image / Add borders / symmetric desmarcado: Top e Botom= 25 / Left e Right= 75 / Cor do background.


11. Effects / Plugin / Simple / Blintz.

12. Image / Flip.

13. Repita o Effects / Plugin / Simple / Blintz.

14. Effects / Image effects / Seamless Tiling: Corner e Bilateral marcados / 25 / 65 / 50 / Linear marcado.


15. Layers / Duplicate.
Image / Resize em 85%, resize all layers desmarcado.

16. Image / Mirror.
Image / Flip.

17. Ative a ferramenta Selection e clique no quadradinho central da barra de ferramentas (Layer opaque).
Sua imagem ficará selecionada assim:


18. Effects / 3D Effects / Drop Shadow: 0 / 0 / 75 / 35 / - preto.


19. Selections / Promote selection to layer.
Selections none.

20. Image / Resize em 80%, resize all layers desmarcado.

21. Ative a ferramenta Selection / Custom selection: Top 88 / Left 314 / Bottom 462 / Right 485


22. Effects / Plugins / Mura's Meister / Copies.


23. Effects / 3D Effects / Drop Shadow, como antes.

Selections none.

24. Layers / Merge Down.

25. Réduza a opacidade para 50%.

26. Selections / Select all.

Image / Add borders / symmetric desmarcado; Top e Botom= 25 / Left e Right= 75 / Cor do foreground.


27. Selections / Invert.

Effects / Plugins / Mura's Meister / Copies, como antes.

Selections none.

28. Layers / New raster layers.
Pinte com a cor do foreground.

29. Layers / New mask layer / From image. Localize e aplique a mask cre@nnie-41.


Layers / Merge Group.

30. Mude o Blend mode para Soft Light.


31. Selections / Load/save selection / load selection from disk. Localize a seleção x-mas-1-cre@nnie.


32. Effects / Texture effects / Blinds: 7 / 20 / Horizontal e Light from top/left marcado / Cor do background.


33. Layers / New raster layer.
Effects / 3D Effects / Drop Shadow: 0 / 0 / 50 / 50,00 - cor preta.

Selections none.

34. Ative a raste abaixo de todas (backgrond).

Layers / Duplicate.
Effects / Plugins / Mura's Meister / Pole Transform: 0 / 200 / 100 / 100 / 0 / 200 / 0


35. Effects / Geometric effects / Circle / transparent marcado.


36. Image / Resize em 30%, resize all layers desmarcado.

37. Selections / selection all.
Selections / Float.
Selections / Defloat.

38. Layers / New raster layer.
Abrir o tube christmasbal - Edit/ Copy.
Edit / Paste into selection na imagem.

Mude o Blend mode para Overlay.


39. Layers / Merge Down.

40.Layers / New raster layer.

Selections / Load/save selection / load selection from disk. Localize a seleção x-mas-2-cre@nnie.


41. Pinte com a cor do foreground.

42. Effects / Plugins / Alien Skin Eye Candy 5 Impact / Glass.
Selecione o preset Clear e dê ok.


43. Layers / Merge Down.
Selections none.

44. Image / Resize em 50%, resize all layers desmarcado.

45. Effects / Image effects / Offset: Horiznotal= 400 / Vertical= 117 / Transparent e Custom marcados.


46. Layers / Duplicate.
Image / Resize em 80%, resize all layers desmarcado.

47.Effects / Image effects / Offset: Horiznotal= -7 / Vertical= -85 / Transparent e Custom marcados.

48. Layers / Duplicate.
Image / Resize em 80%, resize all layers desmarcado.

49. Effects / Image effects / Offset: Horiznotal= 120 / Vertical= -85 / Transparent e Custom marcados.


50. Layers / Merge Down.
Repita, Layers / Merge Down.

51. Abra o tube deco-x-mas-2016 - - Edit / Copy.
Edit / Paste as new layer na imagem.

52. Effects / Image effects / Offset: Horiznotal= 358 / Vertical= 129 / Transparent e Custom marcados.


53. Layers / Arrange / Move Down.

54. Ative a layer acima dessa (copy of Background)


55. Layers / Merge Down.

56. Effects / 3D Effects / Drop Shadow: 2 / 2 / 75 / 5,00 - cor preta.


57. Ative a layer abaixo de todas (Background).

Selections / Load/save selection / load selection from disk. Localize a seleção x-mas-3-cre@nnie.


58. Effects / Plugins / VM Natural / Sparkle: 16 / 255 / 255 / 255 / 255 / 142.


59. Selections none.

60. Ative o tube Min@.4146.Woman.07.16 - Edit / Copy.
Edit / paste as new layer na imagem.

Layers / Arrange / Bring to Top.

61. Image / Resize em 95%, resize all layers desmarcado.

Mova o tube para baixo.

62. Layers / Duplicate.

63. Adjust / Blur / Gaussian Blur: Radius 35.

64. Layers / Arrange / Move Down.
Mude o Blend mode para Multiply.

65. Abra o tube tekst-x-mas-2016 - Edit / Copy.
Edit / Paste as new layer.

Mova para a direita.

66. Effects / 3D Effects / Drop Shadow como antes.

67. Image / Add borders 1 pixel, symmetic marcado na cor do background.

68. Selections / Select all.

69. Image / Add borders 25 pixels, symmetric marcado na cor do foreground.

70. Effects / 3D effects / Drop Shadow: 0 / 0 / 75 / 35,00 - cor preta.


Selections none.

71. Assine.

72. Image / Add borders 1 pixel, symmetic marcado na cor do background.

73. Image / Resize a 800 pixels Widht.

74. Salve como Jpeg.


Aperf. VIII - 49 Xena


Plugins:
Filters Unlimited 2.0 
& (importado pelo Unlimited) ici
Texture - Texturizer 


Colocar as seleções na pastinha de seleções.


1. Abra uma imagem transparente de 650 x 500 pixels.

2. Coloque no foreground a cor clata #e4a3c3,
e no background a cor escura #211c24.


3 Pinte a imagem com a cor clara do foreground.

4. Layers / New raster layer.
Pinte com a cor escura do background.

5. Image / Resize em 50%, resize all layers desmarcado.
Layers / merge down.

6. Effects / Image effects / Seamless tiling / Defauld.


7. Effects / Image effects / Seamless tiling> Corner e bidirecional marcados /25 /100 /94 / Linear marcado.


8. Layers / Duplicate.
Image / Mirror.
Mude o Blend mode para Hard Light.


Layers / Merge down.

9. Layers>Duplicate.

Effects / Distortion Effects / Polar Coordinates: Polar to Rectangular marcado.


Reduza a opacidade para 50%.


Layers / Merge down.

Effects / Edge Enhance / Enhance.

10. Layers / New raster layer.

Ative a ferramenta Selection / Custom selection: Top= 0 / Left= 163 / Bottom= 126 / Right= 489.


Pinte a seleção com a cor do foreground.
Selections none.

11. Effects / Distortion effects / Polar Coordinates: Rctangular to Polar e Transparent marcados.


12. Effects / 3d effects / Drop Shadow: 0 / 0 / 80 / 25,00 - preto.


13. Layers / Duplicate.
Image / Flip.

14. Effects / Distortion effects / Polar Coordinates como antes.

15. Effects / Image effects / Offset: Horizontal= 0 / Vertcail= 35 / Custom e transparent marcados.


Layers / Merge Down.

16. Layers / New raster layer.

Selections / Load/save selection/ Load selection from disk. 
Localize a seleção xena-1-cre@nnie.


Pinte com a cor do background.
Selections none.

17. Effects / 3D effects / Drop Shadow como antes.

Layers / Arrange / Move Down.

18. Ative a layer acima de todas.
Layers / Merge Down.

19. Layers / Duplicate.
Image / Flip.
Layers / Merge Down.

Mude o Blend mode para Dodge


20. Effects / Image effects / Seamless Tiling: Corner, Bidirecional e Linear marcados / 0 / 100 /94 


21. Layers / New raster layer.

Selections / Load/save selection/ Load selection from disk. 
Localize a seleção xena-1-cre@nnie.


Pinte com a cor do foreground.
Selections none.

22. Effects / Distortion effects / Wave: 25 / 50; 0 / 100; Transparent marcado.


23. Layers / Duplicate.
Image / Mirror.
Layers / Merge Down.

24. Image / Flip.

Effects / Image effects / Seamless tiling nas mesmas configurações usadas.

Mude o Blend mode para Dodge.


25. Layers / Merge Visible.

26. Effects / Plugins / Texture / Texturizer: canvas / 100 / 4 / Bottom e Invert desmarcado


27. Edit / Copy.

28. Image / Add borders 25 pixels, symmmetric, na cor do background.

29. Effects / Image effects / Seamless Tiling / Default.


30. Adjust / Blur / Gaussian Blur / Radius 25.


31. Edit / paste as new layer.

32. Reduza a opacidade para 25%.


33. Effects / 3D effects / Drop Shadow como antes

34. Image / Add borders / symmetric desmarcado / Top e Bottom= 25 / Left e Right = 75 /Cor do foreground.


35. Effects / Plugins / Filters Unlimited 2.0 / &


36. Effects / Plugins / Filters Unlimited 2.0 / & / Kaleidoscope persian: 255 / 255


37. Selection / Custom selection: Top= 402 / Left= 0 / Bottom= 600 / Right= 850.


Selections / Promote selection to layer.
Selections / Invert.

38. Layers / New raster layer.
Effects / 3D effects / Drop Shadow como antes.

Selections none.

39. Layers / Duplicate.
Effects / Image effects / Offset como antes (H=0 e V= 35 - transparent).

Layers / Merge Down.

40. Effects / Distortion effects / Wave: 25 / 50; 10 / 100 / Wrap marcado.


41. Layers / Duplicate.
Image / Flip.
Image / Miror.

Layers / Merge Down.

42. Ative a raster do meio (Promoted selection).


43. Effects / Distortion effects / Warp: 1 / 5 ; 83 / 82


44. Effects / Plugin / Texture /Texturizer, como antes.

Effects / 3D effects / Drop Shadow como antes.

45. Layers / Duplicate.
Image / Flip.
Image / Mirror.

46. Layers / New raster layer.
Selections / Load/save selection/ Load selection from disk. 
Localize a seleção sélection xena-2-cre@nnie.


Pinte com a cor do foreground.

Selections none.

47. Effects / Plugins / Alien Skin Eye Candy 5 Impact / Glass.
Selecione o preset Clear e dê ok.


48. Effects / Distortion effects / Wave como antes.

49. Selections / Select all.

Image / Add borders / 25 pixels, symmetric marcado / cor do foreground.

50. Effects / 3D effects / Drop Shadow como antes.

Selections / Invert.

51. Effects / Plugin / Texture / Texturizer, como antes.

52. Selections / Select all.
Image / Add borders / 50 pixels, symmetric / cor do background.

53. Effects / 3D effects / Drop Shadow como antes.
Selections none.

54. Ative o tube Alies 1VR875-woman-08022014, Edit / Copy.
Edit / Paste as new layer na imagem.
Image / Resize em 105%, resize all layers desmarcado.

Mova para a direita e posicione como no modelo.

55. Effects / 3D effects / Drop Shadow: 0 / 0 / 80 / 50,00 - preto e Shadow on new layer marcado,


56. Effects / Distortion effects / Wave como antes.

Image / Mirror.
Mude o Blend mode pra Soft Light.


57. Ative a layer de cima.

Assine.


58. Image / Add borders 1 pixel, symmetric na cor do background.

59. Image / Resize a 800 pixels Widht.

60. Salve como Jpeg.


Aperf. VIII - 48 Wood


1-Abra uma image 700 x 500
2-Pinte com a cor # 2e3229 (escuro)
3-Layer, New Layer
4-Selecionar tudo
5-Cole na seleção do textura46
6-a opacidade 82%
7-Com a ferramenta Selecionar para desenhar um retângulo pode guiá-lo através do modelo

8-Layer, New Layer
9-Abrir tubo 35Xj-KTS-21
10-Adjust colorize, 60/25
11-Colar mover e escolher o que você gosta que esteja na seleção
12-Seleções, inverter, pressione Delete no teclado
13 Layers, duplicar
14 Efeitos 3D -cutot preto 6/6/30/5 preto

15 Layers, duplicar
16 Efeitos 3D -cutout -6/-6/30/5
17 Selection none
18 Merge down
19 Merge down
20-Efeitos, efeitos de textura, blinds

21 - Com a ferramenta Selecionar para desenhar um retângulo de coordenadas , pode guiá-lo através do modelo

22-abra-tube sandi decos884
23 Adjust colorize 60/25
24 Ajsut brilho e contraste os dois valores em 20
25-Cole na seleção
26 - Layers, duplicar
Efeitos 3D 27-cut preto 6/6/30/5 colorido
28 camadas, duplicar
29 Efeitos 3D -cutout -6/-6/30/5 colo

30 Selection none
31 cMerge down
32-Mais uma vez,merge down
33-Efeitos, efeitos de textura, blinds

34-aplicar a sombra nos dois retângulos 5/5/37/12, 87
35 Se quizer arrume os retangulos
36 Ative layer de textura
37-Selecione, selecione tudo
38-Seleções modific, contrat 100
39 efeitos 3D, Chisel

40 Repita os passos de 37, 38 e 39 com os valores de modific contrat 75, 50, 25 e 2
41 Ative a layer do topo
41-Copie e cole @ nn-120209-fotos-woodcollection1
42- Resize 80%
43-Aplique sombra 7/7/37/8 preta
Merge all
44-imagem, adicionar bordas, 3pix branco
45-Selecione-o com a varinha e pinte com a patnner dourada do material
46-Image, adicionar bordas 20pix branco
47-Selecione-o e cole em textura do inicio
48-Seleção float,
49-Efeitos 3D CUT, mesmos valores antigos
50-Copie e cole Corazon46
51-Organizar no canto superior direito (ver modelo)
52 - Imagem, adicionar bordas, branco 3pix
53-Selecione-o com a varinha e e pinte com a patnner dourada do material
54 Cole os cantos
55-Aplicar texto marca d'água ou
56 Salvar.


Aperf. VIII - 47 Winter


Plugins
factory gallery b/ seismic twirl
Simple/ Half Wrap
Filter Factory Gallery B_ Vibes
AP Lines/ Lines SilverLining
plugin personalizado_ Emboss 3

Abrir todos os tubes no Psp. Duplique -os e feche os originais

1.-
Abrir uma imagem transparente de 900x600 pixeles
Selections all
Abria a imagem para o fundo em formato jpg
Esta imagen é que vai determinar as cores do trabalho
Neste tutorial foi usada a imagen Enlacama
Edit / Copy
Edit / Paste into selection
Selections none
Adjust / Blur / Gaussian blur / 50
Effects / Plugins / factory gallery b/ seismic twirl


Effects / Plugins / Simple/ Half Wrap
2.-
Layers / Duplicate
Effects / Distortion effects / Lens Distortions: H= -398/ v= 299 / Barrel/ 100 / Transparent marcado


3.-
Layers / New raster layer
Pintar com a cor branca
Ativar a mask Narah_mask_0454
Layers / New mark layer / from image
Procurar a mask de Narah_ Narah_mask_0454


Layers / Merge Group
Mude o Blend mode para Overlay
4.-
Layers / New raster layer
Pinte com a cor #6c3417
Layers / New mark layer / from image
Procurar a mask de Narah mask_mask_0478

Layers / Merge group
Mude o Blend Mode para Dodge
Layers / Duplicate
Mude o Blend Mode para Dodge
Layers / Duplicate
Mude o Blend Mode para Dodge
5.-
Ative a raster copy of raster 1 (onde aplicou o Lens Distortion)
Selectins all
Selections / Float
Selections / defloat
Ative Group Raster 2 e aperte a tecla Delete.
Faça o mesmo comt todas as outras layers de mask e duplicadas
Mantenha a seleção
6.-
Ative a raster acima de todas
Layers / New raster layer
Selecciones_ Invertir
Ativar a imagen mist del paisaje_ CALGUISMISTEDWNTER2012015
Edit / Copy
Edit / Paste into selection
7.-
Selections / Invert
Layers / New raster layer
Edit / Paste into selection
(A paisaje ainda está na memória)
Selections none
8.-
Ative novamente a raster copy of raster 1 (onde aplicou o Lens Distortion)
Effects / Drop Shadow: 0 / 0 / 60 / 20 - preto
9.-
De novo vamos ativar a layer acima de todas
Active a imagen 0_b1978_aa7fff96_XL
Edit / Copy
Edit / Paste as new layer
Colocar na borda direita
Ver modelo original
10.-
Ativar a imagen KaD_WinterWoman11
Edt / Copy
Edit / Paste as new layer
Apague a marca d'água
Image / Resize para 75%
Resize all layers desmarcado
Posicionar à gosto
eu a coloquei do lado inferior direito
Ver modelo original
Effects / Drop Shadow: 0 / 0 / 50 / 30 - preto
11.-
Ativar a imagen blackriderrom_Soft_LIght_01_2
Edit / Copy
Edit / Paste as new layer
Image / Negative image
Effects / User Defined / Emboss 3
Opacidade em 45%
Não mova
12.-
Suas layers estarão assim


13.-
Image / Add borders / 2 pixels na cor escura #6e2f15
Image / Add borders / 25 pixels na cor clara #dfdca8
Ative a varinha mágica / Selecione a borda de 25 pixels
Effects / Plugins / Filter Factory Gallery B / Vibes: 180


Adjust/ Blur / Radial blur: Spin / 25 / Eliptical marcado / 0 / 0 / 0


Effets Plugins / AP Lines/ Lines SilverLining / Dotty Grid: 10 / -1 / 10 / 255 / 255 / 255


Effects / User Defined / Emboss 3
Selections none
14.-
Ative o tube 12926131084_animaux_nikita
Edit / Copy
Edit / Paste as new layer
Image / Resize em 45%
Resize all layers desmarcado
Colocar na parte inferior esquerda
Ver modelo
Effects / Drop Shadow: 0 / 0 / 50 / 30 - preto
15.-
AssinarImage / Add borders / 2 pixels na cor escura #6e2f15
Salvar como Jpeg
Stella