
Cor do foreground #d1661f e cor do background #f8d99e
No foreground, forme o gradiente(= Corel_06_029 nas versões recentes de PSP)
ou, Style Radial - Angle = 90 - Repeat 8 - Invert = desmarcado
Horizontal = 60 Vertical = 40

Étapa 1
Abra uma imagem 700 x 550, transparente
Pinte com o gradiente
Adjust Blur / Gaussian blur / 10
Étape 2.
Effects - Plugins - Mehdi - Weaver
Configuração : 150 - 300
Size Range=150

Effects - Edge Effects - Enhance More
Effects - Plugins - Scribe - Partical
Configuração = 4

Adjust - Sharpen
Etapa 3
Mude o gradiente para
Style Sunburst – Repeat 2 – Invert desmarcado
Horizontal e Vertical à 50
Layers - New raster layer
Pinte com o gradiente
Effects - Plugins - I.C.NET Filters - Filters Unlimited - Alf's Border Fx - Border Fade I - Defauld

Etapa 4
Ative a ferramenta Selection Rectangle
Custom Selection: Top 68 / Left 87 / Bottom 482 / Right 615

Effects - Plugins - VanDerLee - Unplugged - X
Configuration : 1 - Preset = Spice dots / 2 - Couleur du 1er Plan (orange)

Effects - Plugins - I.C.NET Filters - Filters Unlimited - Transparency - Eliminate White - Defauld
Mantenha a seleção.
Etapa 5
Sélections - Invert
Aperte a tecla Delete
Mantenha a seleção.
Layers - New raster layer
Abra o tube "fond_feuilles.pspimage "
Edit - Copy
Volte à sua imagem
Edit - Paste into selection
Effects - Plugins - I.C.NET Filters - Filters Unlimited - Transparency - Eliminate White - Defauld
Selections None
Etapa 6
Selections - Seections All
Sélection Floate
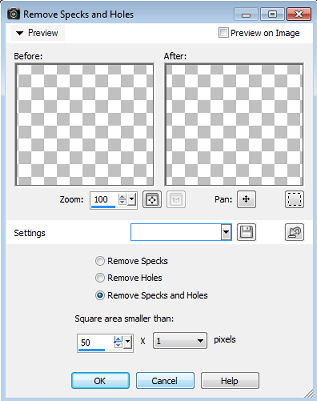
Sélections - Modify - Remove specks and holes
Clique OK.

para aqueles que têm uma versão diferente do PSP
e ter uma janela que se abre, assinale "Remove Specks and Holes"
Effects - User Definened - " Emboss3 "
Effects - 3D - Drop Shadow: 2 - 2 - 50 - 40 / Cor = Preta
Vc tera isso

Etapa 7
Ative a Raster 2

Effects - Plugins - Flaming Pear - Flexify 2
Latitude, Longitude et Spin : -5 - 100 - 90
Input = Equirectangular
Output = Sinusoidal

Effects - Plugins - I.C.NET Filters - Filters Unlimited - BKG Kaleidoscope - Kaleidoscope 8 - Defauld
Edit - Copy
Edit - Paste as new image
Minimize essa nova imagem.
Retorne a sua tag
Delete a Raster2
Etapa 8
Mude o gradiente para Style Linear – Angle = 0 - Repeat 1 – Invert desmarcado
Layers - New raster layer
Ative a ferramenta Selection Rectangle
Custom Selection nos mesmos valores anteriores
Pinte com o gradiente
Selections none
Etapa 9
Layers - Load save mask - Load mask from disk
Aplique a mask "cre@nnie-30.jpg"

Layers - Merge Group
Etapa 10
Layers - New raster layer
Selections - Load/Save selection / Load selection from a disk
aplique a seleção" vir_sel_aa.PspSelection "

Abra a imagem "201204.jpg"
Edit - Copy
Edit - Paste into selection
Mantenha a seleção
Teremos isto:

Etapa 11
Adjust - Blur - Motion Blur
Angle = 200 - Strengh = 100

Effects - texture effects - Mosaic glass
Configuration = 48 - 48 - Symetric marcado
Mosaic settings = 67 - 38 - 3 - 11

Effects - Plugins - Alien Skin Eye Candy 5 : Impact - Glass
Onglet Settings = : Clear - No Drop shadow

Effects - Plugins - Alien Skin Eye Candy 5 : Impact - Perspective Shadow
Settings = Drop Shadow Blurry
Selections none.
Teremos isto:

Etapa 12
Layers - Duplicate
Effects - Plugins - Mura's Meister - Perspective Tiling
Height = 28

Etapa 13
Effects - Effetvs geometric - Spherize
Ellipse = marcado

Adjust - Sharpen
Mude o blend mode para "Multiply"
Reduza a opacidade à 80.
Layers - Merge All.
Temos isto:

Etapa 14
Images - Add Borders - Symetric = marcado
1 Pixel = na cor do foreground
1 Pixel = na cor do background
Images - Add Borders - Symetric = desmarcado
Com os seguintes valores: Top e Bottom 0 / Left e Right 115
Com a varinha mágica - tolerance 0
Selecione as 2 bordas brancas
Layres - New raster layer
Abra a imagem "201204.jpg"
Edit - Copy
Edit - Paste into selection
Mantenha a seleção
Etapa 15
Effects - Distortion effects - Pixelate
Configuration : 3 - 119 - Symetric = desmarcado

Adjust - Sharpen
Selection - Promote selection a layer
Selections None
Etape 16
Effects - Distortion effects - Polar Coordinates - Rectangular to Polar - Transparent
Configuration =

Repita o efeito
Teremos isto:

Etapa 17
Effects - Geometric Effects - Circle
Transparent = marcado
Repita o efeito
Image - Resize - 85% - all layers desmarcado
Étape 18
Effects - Image effects - Offset: Horizontal = -184 / Vertical = -10 - Transparent
Ficará assim:

Etapa 19
Layers - Duplicate
Image - Flip
Layers - Merge - Merge down
Layers - Duplicate
Image - Mirror
Layers - Merge - Merge down
Effects - 3D Drop Shadow: 2 - 2 - 50 - 50 / Cor = Preta
Adjust - Sharpen- Unsharp Mask

Etapa 20
Ativer a Raster debaixo (Raster 1)

Effects - Plugins - I.C.NET Filters - Filters Unlimited - Blur - Transblur - Defauld ( 22 - 9)

Effects - Plugins - I.C.NET Filters - Filters Unlimited - Bkg Kaleidoscope - Flip SideRsf

Selections - Selection all
Selections - Float
Effets - 3D - Drop Shadow: 3 - 2 - 50 - 50 / Cor = Preta
Selections None
Layers - Merge All
Etapa 21
Image - Add Borders - Symmetric marcado
12 Pixels - Cor = Blanc
Com a ferramenta conta gotas, escolha na sua imagem uma cor para colocar no foreground
Escolhi a cor #6d461e
Image - Add Borders - 22 Pixels - Cor = #6d461e
Selecione essa borda
Effects - Textures Effects - Stores: 2 - 40 - Cor do background - Horizontal e Light from marcados
Selections - Invert
Effets - 3D - Drop Shadow: 3 - 2 - 50 - 50 / Cor = Preta
Selections None.
Etapa 22
Selectione com a ferramenta selection - rectangle a parte da borda, à esquerda e em cima, para colocarmos a decoração.
Abra uma nova layer e pinte com a cor do background
Tire a seleção. Layers - Duplicate. Image - Mirror. Layers - Merge - Merge Down.

Abra aquela image que vc duplicou na etapa 7
Image - Resize entre 28 à 30% (varia de acordo com o tamanho do quadrado traçado)
Edit - Copy
Volte à sua tag
Edit - Copy as new layer
Posicione como mostro:

Layers - Duplicate
Layers - Merge - Merge Down
Layers - Duplicate
Image - Miroir
Layers - Merge - Merge all.
Image - Add Borders - 1 Pixel - Cor do Background
Etapa 23.
Escolha uma nova cor para o foreground.
Eu escolhi a cor #f9e2c8
Forme uma gradiente: Style Linear – Angle = 45 - Repeat 5 – Invert desmarcado

Image - Add Borders - 35 Pixels - Cor = Branca
Selecione a borda branca de 35 Pixels
Pinte com o gradiente
Effects - Textures Effects - Weave: 471 / 735 / 78 - Wave color #d1661f

Effets - Plugins - Filters Unlimited - Base I.C.NET - Paper Textures - Canvas, Fine - Defauld

Selections - None
Image - Add Borders: 1 Pixel = cor #6d461e

Etapa 24.
Abra o tube " Orange_Blossoms_LCT_Oct_08.psp " (fleurs)
Image - Resize
Marca "Resize all layers" - 77%
Edit - Copy
Edit - Paste as new layer.
Effets - 3D - Drop Shadow: 0 - 20 - 40 - 30 / Cor = Preta
Etapa 25.
Volte o foreground para a cor inicial #d1661f
Forme o gradiente: Style Linear - Angle 45 - Repeat 5 e Invert marcado

Ative a ferramenta Pen tool
Configuration : style de line = losanges ou diamonds / width 12

Mantendo pressionada a tecla Shift (para desenhar uma linha fina direita)
Desenhar uma linha entre a borda da esquerda
Desenhar uma linha entre a borda da esquerda

Layers - Convert to raster layer
Adjust - Sharpen
Layers - Duplicate.
Image - Mirror
Layers - Merge - Merge Down
Effets - 3D - Drop Shadow os mesmos valores anteriores
Etapa 26
Assine
Resize a 1000 px Width.
Salve.


Nenhum comentário:
Postar um comentário