
Obrigada maxou por autorizar a tradução
Plugins:
Ap 01
Mura's Meister
Toadies
Eye Candy 5
Bkg Kaleidoscope

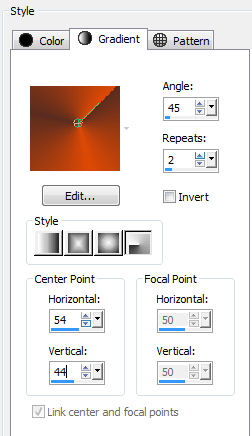
Prepare um gradiente Style Radial/ Angle 45 / Repeat 2 / Invert desmarcado / Center Point com Horizontal 54 e Vertical 44
1_ Abra uma imagem transparente de 900 X 650 px
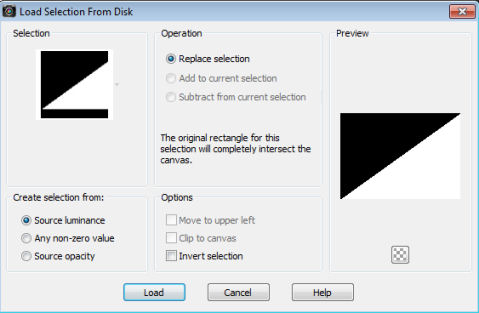
Selection / Load/save selection / from disk. Localize a seleção "maxou_611"
pinte com o gradiente
2_Selections / Invert
Pinte com a cor do foreground
Selection none
Layers / Duplicate
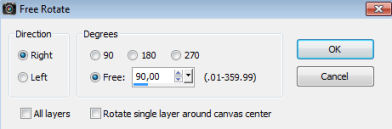
3_Image / Rotate / Free rotate: 90 / Right
4_Image / Flip
5_Effect / plugin / untlimitted2 / bkg kaleidoscope / mirror scalled

Layers / Merge Down
Effects / Edge / Enhance
6_Ative a ferramenta Selection / Custom selection: Top 161 / Left 124 / Bottom 498 / Right 774

Selection / promote selection to layer
Selection none
7_Effect / Plugin / toadies /what are you a 85/58
Effects / Edge / Enhance
8_Abra nova layer
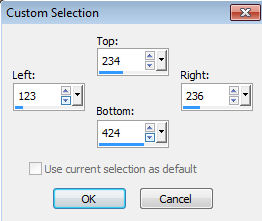
Selection / Custom selection: Top 234 / Left 123 / Bottom 424 / Right 236
Pinte com o gradiente
9_Effect / plugin / Unlimited / afs / squorborder2

Mantenha a seleção
10_Effect / plugin / untlimmitted 2 / bkg kaleidoscope /mirror scalled
Selection none
11_Abra nova layer
Selection / Load/save selection / from disk. Localize a seleção "maxou_612"

Pinte com o gradiente
12_Effect / plugin / kang3/oz

13_Effect / Plugin /Eye candy 5 /impact / glass
click sobre a opção Clear (Aba settings)
Selection none
Mude o Blend mode para Overlay
14_Layers / Duplicate
Teremos isso:

e a imagem assim:

Layers / merge down / 2 vezes (os 2 botões e o quadrinho)
15_Layers / duplicate
image / mirror
Layers / merge down
Drop Shadow: 0 / 0 / 100 / 40 preto
Ative a raster Promoted selection (layer do meio)
Mude o blend mode para Overlay
Teremos isso:

Ative a raster de baixo (raster1)
16_Selection / Load/save selection / from disk. Localize a seleção "maxou_613"

Promoted selection to layer
Pinte com a cor do foreground
Layers / Arrange / Bring to Top
17_Sselection / modify /contract 20
Pinte com o gradiente
18_Adjust / Blur / gaussian blur: 25
19_Effect / plugin / ap lines01 /lines-silverlining

Drop Shadow: 0 / 0 / 100 / 40 preto
Selection none
20_Abra nova layer
Selection / Custom selection: Top 235 / Left 363 / Bottom 422 / Right 537

Pinte com o gradiente
21_Adjust / Blur / gaussian blur: 25
22_Edit e copy no tube (ophelia_overdose_deep_silence_by_ophelia_overdose_tubed_by_thafs.psp)
Edit /Paste into selection
23_Effect / plugin / aaa frame / foto frame
Selection

Sua paleta de layers estará assim

e sua imagem assim:

Ative a Raster 1
24_Selection / Custom selection: Top 0 / Left 387 / Bottom 650 / Right 512

Pinte com a cor do foreground
Selection none
25/copie e cole o element 1 maxou
não mexa
(colorize se necessário)
mude o blend mode para Screen
26_Copie e cole o element 2 maxou
não mexa
(colorize se necessário)
mude o Blend mode para Hard Light
Teremos isso:

27/Ative a ferramenta Crop e selecione toda a imagem, afim de deixar todas as alyers com a mesma medida e melhor aplicar o plugin mura meister

Feche a visibilidade da raster 1
28_Ative uma outra layer e de Merge Visibles
Ative a layer debaixo (raster 1)
Volte a visibilidade
Layers / duplicate
29_Effect / plugin /mura's meister /perspective tiling / Height 12

As layers estarão assim:

Ative a layer debaixo (raster1)
30_Copie e cole o element 3 maxou
Ative a layer acima de todas
31_Copie e cole o wordart dreams
posicione como no modelo
32_Copie e cole o texte afric
posicione como no modelo
33_copie e cole o tube(DBK AFRIKAN_033.pspimage)
Resize 60%
Mova para a direita como no modelo
34_Copie e cole o tube deco (DBK DECOR-005 - Copie.pspimage)
(Dê um resize de mais ou menos 20%, apague a base preta e posicione na imagem com estão no modelo ou de outra maneira que lhe agradar)
34_Image / add borders 1 px preta
Selection all
Edit / Copy
35_Image / add borders 45 branca
Selection / Invert
Edit / paste into selection
36_Adjust / Blur / Gaussian blur 5
37_Effect / plugin / Tramage /too the line: 20/35/126/56

38_Effect / plugin / toadies /what are you: 7/7
Selection / Invert
Drop Shadow: 0 / 0 / 100 / 55 preto
Selection none.


Nenhum comentário:
Postar um comentário